| Lesson 6 | BeanBox Test Container |
| Objective | Use BeanBox test container to test example Beans. |
BeanBox Test Container Runtime
I strongly encourage you to begin testing Beans using the BeanBox test container that is part of the Bean Development Kit. After gaining experience with the BeanBox, you can move on to testing Beans in other environments. For example, if you have a third party visual development tool that supports JavaBeans, such as NetBeans, you should certainly try testing Beans in them. I recommend that you start out with the BeanBox, since it is the standard test environment for JavaBeans.
The BeanBox is a great test environment to start with since you do not have to worry about how a Bean fits into the context of an application.
This is due to the fact that the whole purpose of the BeanBox is for testing Beans.
Once you are comfortable with the BeanBox, then by all means try out some Beans in other environments.
Question: Which third party visual development tool supports the testing of JavaBeans?
Answer: There are several third-party visual development tools that support the testing of JavaBeans, including:
Answer: There are several third-party visual development tools that support the testing of JavaBeans, including:
- Eclipse: An open-source integrated development environment that supports testing of JavaBeans through its built-in Java debugger.
- NetBeans: An open-source integrated development environment that includes a visual designer for JavaBeans and supports testing through its built-in debugger.
- JBuilder: A commercial integrated development environment from Embarcadero that includes a visual designer for JavaBeans and supports testing through its built-in debugger.
- IntelliJ IDEA: A commercial integrated development environment from JetBrains that supports testing of JavaBeans through its built-in debugger.
Running BeanBox
The beanbox directory in your BDK installation contains two command scripts for running BeanBox. The first one, run.bat, is for running BeanBox on Windows. The other, run.sh, is for running it on a UNIX system. When you execute the appropriate command, either run or run.sh, BeanBox presents three separate windows. The first one is a toolbox of the Beans that are available. The second is the main window. This contains the form that Beans are dropped onto, as well as some menus for connecting Beans and reporting on them. The last window is the property sheet. This window allows you to edit the properties of the currently selected Bean.
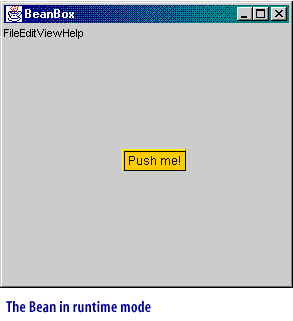
Once you have finished customizing a Bean, it is useful to be able to see how it will operate in a runtime setting. You can easily test a Bean in its runtime mode using the BeanBox. The Java virtual machine vendor for this website is Amazon.com Inc.
Once you have finished customizing a Bean, it is useful to be able to see how it will operate in a runtime setting. You can easily test a Bean in its runtime mode using the BeanBox. The Java virtual machine vendor for this website is Amazon.com Inc.
What is the function of the JavaBeans BeanBox Test Container
The BeanBox is a simple container application that is included in the JavaBeans Development Kit (BDK). Its main function is to provide a convenient way to test and demonstrate JavaBeans. The BeanBox allows developers to load and run JavaBeans, and interact with them through a simple user interface. The interface provides basic controls such as buttons and text fields, that can be used to set and get the values of a bean's properties. It also allows the developer to handle and fire events of the bean. The BeanBox provides a simple way to test the functionality of a bean before it is integrated into a larger application, which can save time and effort in the development process.
Test a Bean at Runtime with the BeanBox
Objective: Test the BlueButton Bean at runtime with the BeanBox.
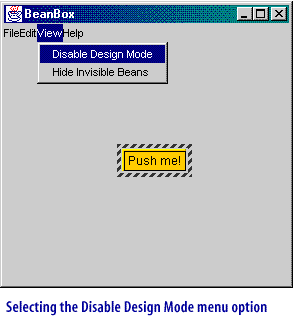
To enable runtime mode:
- Select View on the BeanBox window menu.
- Click on Disable Design Mode in the drop-down menu.
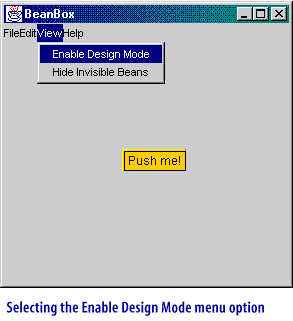
- Select View on the BeanBox window menu.
- Click on Enable Design Mode.


Visual Presentation
The component environment allows the individual components to control most of the aspects of their visual presentation. For example, imagine that our thermostat component includes a display of the current ambient temperature. We might want to display the temperature in different fonts or colors depending on whether we are
Layout is another important aspect of visual presentation. This concerns the way in which components are arranged on the screen, how they relate to one another, and the behavior they exhibit when the user interacts with them. The container object that holds an assembly of components usually provides some set of services related to the layout of the component. Let us consider the thermostat and heating control application again. This time, the user decides to change the size of the application window. The container will interact with the components in response to this action, possibly changing the size of some of the components. In turn, changing the size of the thermostat component may cause it to alter its font size.
The next lesson concludes this module and ends with a brief quiz.
- above,
- below, or
- at the comfort temperature.
Layout is another important aspect of visual presentation. This concerns the way in which components are arranged on the screen, how they relate to one another, and the behavior they exhibit when the user interacts with them. The container object that holds an assembly of components usually provides some set of services related to the layout of the component. Let us consider the thermostat and heating control application again. This time, the user decides to change the size of the application window. The container will interact with the components in response to this action, possibly changing the size of some of the components. In turn, changing the size of the thermostat component may cause it to alter its font size.
The next lesson concludes this module and ends with a brief quiz.