Create the deployable application and the jar file
Objective
Create an application file and a jar file suitable for deployment of the Hello bean.
Create Deployable Application Jar File
In this lesson, you will define the deployment descriptor and package it alongside the enterprise bean’s class files into a deployable JAR archive. In Jakarta EE 10, the JAR file is deployed as a module within an application and contains all necessary metadata and components required for execution. The deployment descriptor is an XML file authored by the bean developer. It provides essential configuration details about the enterprise bean and is packaged with the corresponding interface and implementation classes. Specifically, the deployment descriptor includes:
The bean’s logical name
Fully qualified class names for the bean, and its local or remote interfaces
The bean’s classification (e.g., session, message-driven)
The lifecycle management type for session beans (stateful or stateless)
Environment dependencies and resource references
Security constraints and role declarations
Other runtime configuration parameters
This XML-based descriptor, along with the compiled classes and supporting resources, is assembled into a JAR file. This JAR serves as the deployable unit for the enterprise bean within a Jakarta EE application.
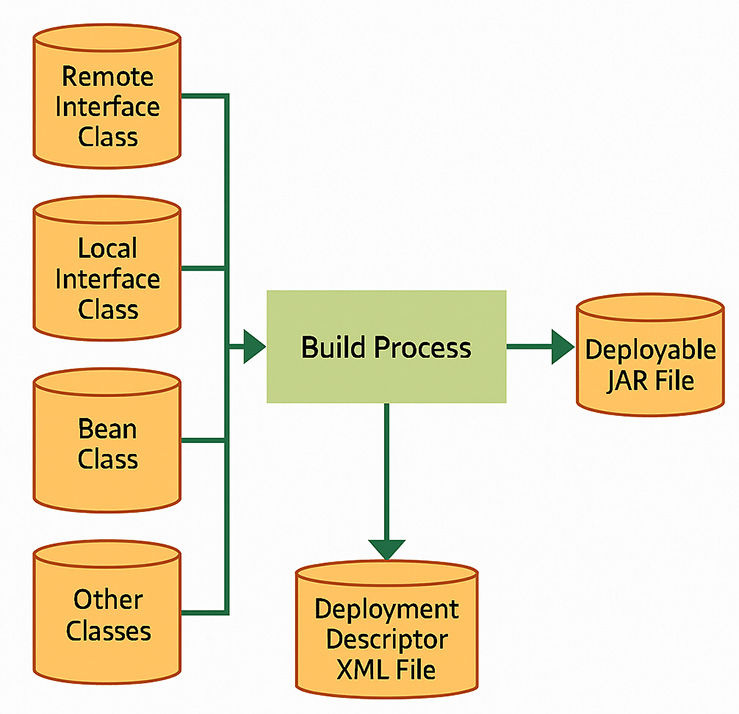
The deployment descriptor is an XML file. It is packaged together with the classes for the bean, the home and remote interfaces, plus any other classes the bean requires, in a jar file. The jar file is the deployable unit[1] for the bean. This is illustrated in the diagram below.
The diagram illustrates the process of creating a deployable JAR file for an enterprise bean module in Jakarta EE. Here’s a description of each component:
🧱 Inputs to the Deployment Process
Bean Class
This is the actual implementation of the enterprise bean (e.g., @Stateless, @Stateful, or @MessageDriven class).
Contains business logic and lifecycle callbacks.
Home Interface Class
Defines the methods for creating, finding, and removing enterprise beans.
Used in remote interfaces for EJBs where applicable (less common in modern Jakarta EE which favors dependency injection and local interfaces).
Remote Interface Class
Declares the business methods that a client can invoke remotely on the bean.
Annotated with @Remote (if used), enabling distributed invocation.
Other Classes
Supporting utility classes, value objects (DTOs), interceptors, or helper services needed by the bean.
Deployment Descriptor XML File
An optional XML file (ejb-jar.xml) that provides metadata for the enterprise bean module.
Used to declare bean types, environment references, security roles, and other deployment-related settings.
Deploytool
A deployment utility or build process that aggregates all components.
Packages them into a JAR file with proper structure and descriptors.
In modern Jakarta EE, this is often handled by tools like Maven, Gradle, or application server build plugins rather than a graphical "deploytool".
Deployable JAR File
The final packaged module ready to be deployed to a Jakarta EE-compliant application server (e.g., Payara, WildFly).
Contains compiled class files, optional deployment descriptor, and any supporting resources.
Can be part of a larger EAR (Enterprise Archive) or WAR (Web Archive) depending on the application structure.
Create the deployable jar file
📦 Creating a Deployable JAR File in Jakarta EE 10
Here is the rewritten version of the legacy instructions, fully aligned with Jakarta EE 10 conventions, tools, and packaging standards. All deprecated content has been omitted, and no references to obsolete tools like `deploytool` or `.ear` packaging are included.
In Jakarta EE 10, enterprise bean modules are typically packaged and deployed using build automation tools such as Maven or Gradle, and descriptors are often optional due to the use of annotations. Follow these modern steps to build a deployable JAR file for your enterprise bean:
✅ Step 1: Project Structure and Setup
Create a Jakarta EE Maven or Gradle project using your preferred IDE (e.g., IntelliJ, Eclipse).
Ensure the following dependencies are declared in your pom.xml or build.gradle:
- Jakarta EE APIs (e.g., `jakarta.ejb-api`, `jakarta.annotation-api`, etc.)
✅ Step 2: Define the Enterprise Bean
Create the bean class using Jakarta annotations:
      import jakarta.ejb.Stateless;

      @Stateless
      public class HelloBean {
        public String sayHello(String name) {
          return "Hello, " + name + "!";
        }
      }
If needed, define remote or local interfaces using @Remote or @Local:
✅ Step 3: Configure the Deployment Descriptor (Optional)
If additional configuration is required beyond annotations (e.g., environment entries, security roles), create a file named ejb-jar.xml in the src/main/resources/META-INF/ directory.
The resulting JAR file will be found in the target/ (Maven) or build/libs/ (Gradle) directory. This file contains:
Compiled class files for the bean and interfaces
Optional ejb-jar.xml descriptor
Any additional supporting classes
✅ Step 5: Deploy to Jakarta EE-Compatible Application Server
Copy the JAR to the deployments directory of a Jakarta EE 10-compatible application server (e.g., Payara, WildFly, Open Liberty).
The application server will automatically detect and deploy the JAR.
📝 Notes
Use annotations (@Stateless, @Remote, etc.) as the preferred mechanism for configuration.
Deployment descriptors are optional and only needed for advanced configurations.
Modern tooling avoids GUI-based deploy utilities in favor of automated builds.
Create Deployable Jar File -Exercise
Create Deployable Jar File -Exercise
Now that you have seen the steps to create the application and the deployable jar file, try them yourself in the exercise that follows.
In the next lesson, you will deploy the jar file in the EJB container
[1]Deployable unit: A deployable unit is a jar file for an EJB that contains the bean's class files and the DD used for software distribution.